Hi! I’m back from my break! Feels great to be back home after 3 weeks of travelling. As we settle in some of my blog friends are helping me out with awesome guest posts this week. There is also a giveaway coming up this Thursday.
Today we have Palak from Make It Handmade with an easy sewing project. Love her Festive Flatware project and of course the sewing machine recommendations post (wish I had something like that when I was researching sewing machines).
**********************************************************
Hi all! I’m Palak from Make It Handmade– a site that focuses on sewing, knitting and craft tutorials. I’m so excited to be here at What’s Ur Home Story. Vidya’s blog is such an inspiration for those of us wanting to personalize our homes!
When Vidya asked me to share an easy beginner sewing home dec project I was a bit stumped– I normally recommend skirts as first sewing projects. But then this magic pillowcase popped into my head. This pillowcase is such a simple and satisfying project to make– I might just change my recommendation for beginners!


Materials:
- 1 rectangle of fabric 27″ by 45″ (pillow body)
- 1 rectangle of fabric 9 ” by 45″ (pillow cuff)
- 1 rectangle of fabric 2″ by 45 (this is the optional accent piece)
In addition to the fabric, you will also need scissors, pins, sewing machine and access to a hot iron.
I recommend using quilting cotton and avoiding any slippery fabrics if you are a beginner. Another frugal option is to use a portion of a ‘flat sheet’ from any big box store for the body of the pillow, which is what I did here. You should easily be able to get two pillowcases (and perhaps even a curtain) from a flat sheet that will match your bedding perfectly.
Pillowcase Cuff and Accent:
Start by ironing both the cuff and the accent (if you have it) in half wrong sides together as shown.

Next, find a large space, and lay your fabrics down, taking care to match up the long, 45 inch raw edge as follows:
Note: You’ll notice that I cut my cuff and accent piece slightly larger than my pillow body to
better show how to layer the fabric. All of your fabric layers will be the same length (45″).
Cuff fabric, right (pretty) side up
Pillow body fabric, right side up
Accent fabric, right side up
Now here is the fun part! Roll up the pillow body…


Until you can see the cuff piece and flip it up to the top.

Making sure all the raw edges are together and lined up pin along the edge. Then sew with with a .5 inch seam allowance removing pins as you go.
Now you should have a long tube with the pillowcase body and accent piece tucked inside. Pull on the pillowcase body until everything is turned out.

Tada! Once you’ve pulled your pillowcase out, you’ll see that all the seams for the accent, cuff and pillowcase body are magically hidden inside the cuff. Iron your pillow, taking care to make sure the cuff is flat and even. If the side and bottom seams don’t match up perfectly, you can give them a small trim at this point.
French Seams
Now all we have to do is sew up the sides and bottom of the pillow! Although you can do this with a regular seam, we are going to do a french seam, which is a simple way of hiding all the raw edges.
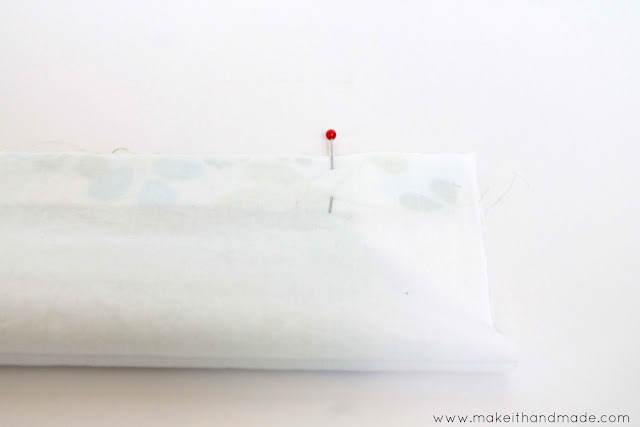
First, fold the pillowcase so the wrong sides together, pin and sew along the bottom and side using a very small seam allowance (around 1/4 of an inch.) An easy way to get a small seam allowance is to move your needle to the furthest right position.

Turn the pillowcase inside out and iron the bottom and side seams very well. Move your needle over to the left and sew with a large seam allowance (5/8 of an inch or larger) down the bottom and side seams again. This will ‘trap’ the raw edges between the two seams.

I’m going to start doing more home dec sewing. It’s wonderful to make something I know is going to fit and will be enjoyed by my family for years to come. I’d love to see you over at Make It Handmade for more sewing and crafting tutorials. Thank you for having me Vidya!
**********************************************************
Thank you Palak for the detailed tutorial. Have added the pillow case to my To Do List. See y’all tomorrow!


Missing you big time Vidya! Glad you are back, hope you had a wonderful vacation.
great post palak!