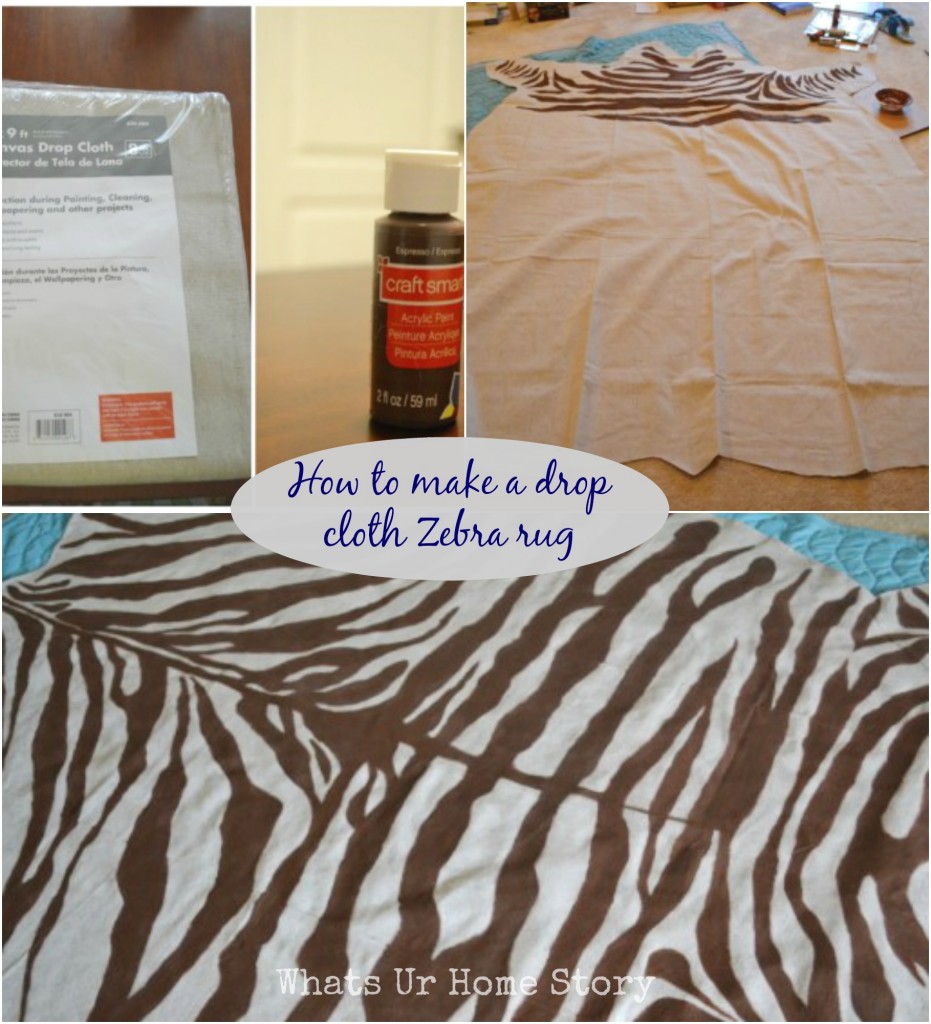
You want to know how I made the zebra rug?

As promised here is the tutorial.
You’ll need:
- A canvas drop cloth
- Printed pics of zebra hides that you can find online
- Pencil, scissors
- Dark Brown or Black Acrylic paint
- Fabric medium
- Acrylic sealer (optional)
- Brushes
- Rug pad (optional)
- Needle and thread (to finish off the edges)
- Plastic drop cloth or something else to prevent the paint from seeping onto your floor/carpet. I used packing blankets that I had.
I used a 6 x 9 drop cloth from Home Depot. I have heard from other bloggers (who did drop cloth rug projects) that you cannot beat the Home Depot /Lowes quality. So try to stick with those brands. As I prefer the dark brown over a taupe look I used brown acrylic craft paint (Craft smart espresso) directly over the drop cloth. If you like the black and white look then you will have to first paint the drop cloth white and use black paint for the stripes.

How to Make A Rug From a Drop Cloth Tutorial
- Fold the drop cloth on the vertical. Measure and cut the drop cloth to size. I wanted at least a 4 x6 rug so I cut off a 5x 8 section.
- Draw the outline on the drop cloth using the zebra hide pics as a reference.

- Leave an inch or two of trim allowance and cut out your shape.

- Now using your printed image as a guideline draw the stripes with the pencil.

- Here is a closer look.

- Hurray the toughest part of the project is over! Now the fun starts, painting. Mix your acrylic paint and fabric medium in a 2:1 ratio (more details in this post) and paint away. I tried using a foam brush but found that using a regular artist brush gave me more control. If you spill over the lines or drop some paint then you can adjust your stripes accordingly. You can also go back and cover any uneven spots. This is such a forgiving pattern.

- Here is another progress shot. Please ignor the mess around the rug. Just keeping it real, the kids were playing while I was slogging away. 🙂

- When you are done painting you’ll end up with this. By the way it took me may be 4hrs over a period of 2 weeks. I just worked on it when I had time.

- A closeup of the stripes as it dries;

- Once the paint is dry follow your fabric medium directions and heat set the paint. If you are going to use the rug in a not so heavy traffic area or a room which does not get much kid abuse then I would recommend skipping the next step, sealing. Based on the fabric medium directions, the paint is washable at this stage. So any minor spills/stains might be ok. But I cannot guarantee that the paint will not fade with frequent washings if it is not sealed.
- To seal, I used a a polycrylic water based sealer (Minwax clear satin finish). I did not use an oil based sealer because I’ve heard somewhere that oil based ‘things’ might increase the chance of a fire in the dryer. So, just want to be on the safer side. I applied a light coat with a foam brush. As soon as I started applying I noticed that the sealer dulled my paint color a little bit, which I didn’t like. This was the reason for doing a light coat vs. a dense coat with a roller.

- Another issue with the sealer is that it gives an uneven shine to the rug in day light. In hindsight maybe doing a thicker coat with a roller might have been a better idea. Test on an extra piece of painted drop cloth to see if it dulls the paint color before you try on the real thing. Let it dry overnight.
- I sewed the edges by hand with the basic running stitch folding the seam at my outline. When it came to the corners I just cut the seam in sections for a better finish.

- Voila, she’s all done! In the end the rug measured 5 x 6.5 ft.

Here is a close-up shot.

Take away: You could add a rug pad if the rug is going to go over a hardwood floor. It has been working great in our carpeted office without the rug pad. If you want to attach a rug pad then I would glue it down to the backside with a fabric glue spray before you finish the edges. When you sew the edge you would be sewing through the rug pad too. This will ensure that the pad stays in place.
Even after cutting out a 5x 8 piece from the drop cloth I have enough fabric left over to make 2 throw pillows.
Source Details
Canvas Drop Cloth -$10.98 – Home Depot Espresso Acrylic paint – $3 approx (I think it was $0.60 each, 5 bottles) – Micheals Acrylic sealer – $8.98 – Home Depot Fabric medium – Already had Brushes – Already hadTotal -$22.96
Isn’t that the best $23 I spent?


this is so cool….
Thank you Sandhya
This is awesome. I am not so fond of the hide rugs but this one looks amazing. Thanks for posting the tutorial, I might try making one some day.
Best,
Amu
Thanks Amu. I was also not into animal prints till last yr until my daughter who had come shopping with me as me to pick a zebra tank top (of course it looked really good). I was sold from that moment on.
Vidya
That looks great!!
Thank you Gina.
You had me up until the sewing part. Still – great idea and execution.
Thank you Jae. 🙂 LOL! You could using a sewing machine. I didn’t want the stitch to be obvious that I way I went with hand sewing. It is nothing fancy just the plain running stitch. I have seen others suggest hot gluing but I’m not sure how that is gonna work if I have to put this in the dryer some day.
Vidya
I adore this. I’ve been looking for images of painted drop cloth rugs because I really want to try it and this is by far my favorite. I wonder if I could pull off more of a cow hide pattern?
Thank you Amy. I looove how it turned out. Hmm… a black and white cow hide might be easier to pull off. With the brown ones, might be difficult to pull off the varying shades of brown.
Vidya
Your rug looks beautiful, thanks for posting your tutorial too! I have this linked to my animal prints DIY roundup post as well today, nice job!
Thanks for the feature Heather. Loved all the other projects in the round up too.
Vidya
I’ve looked at a lot of tutorials for making one of these, and yours is by far my favorite!! Found you from Inspire Me Heather, and I’m so glad I did! You are awesome!!
Thanks so much for stopping by Brooke. It was a really fun project and was easier than I thought. Do share yours when it is done.
Vidya
Your rug looks amazing!!!
Thank you Dee. Checking out your blog now. Love your burlap drapes.
Vidya
It’ s amazing!! I’ll share it on my facebook page.
I’ll follow you.
Regards from spain
Thanks a ton Leti! And thank God for the translate button! So in love with a lot of your projects. The jewelry tray is genius.
Vidya
I was actually researching stenciled rugs when i came across yours…Planning to make one for my daughter’s room..:)
🙂 Let me know how it goes.
Vidya
Btw this one looks awesome..:)
Thank you.
I absolutely love this idea!
Vidya, I am so thrilled you came by!! I am absolutely in love with everything you do! Your taste is magical! Thank you so much for the inspiration! You are amazing! xo
Awww…That’s very sweet of you Molly. Thanks.
I’ve been considering making a drop cloth rug lately. How has yours help up? Have you found it difficult to clean?
Macy,
It is holding up pretty well. It is in our office room. The only thing I would do differently is when sewing the edges, i would use iron on tape to secure any extra fabric to the underside of the rug.In my case with the constant traffic the extra fabric keeps unfurling from under the rug. I just iron it down once in 2 months or so. To clean, we just vacuum it. It is not in an area where there is a chance of a food spill, so not sure how it would fare under a dining table per se.
Hope that helps. do let me know if you make one.
Vidya
Vidya
OMG that is amazing!! Look at all the time and love that went into every zebra stripe..lol. Thanks for sharing. Have a great day, Lisa
You rock. That is all.
And you are always too sweet. 🙂 Thanks Angie.
Vidya
Love this!! When I get some spare time I’m so doing this! Used to sell genune cowhide rug throws and they are very expensive This would be more practical for us, anyway!!
I do like original cow hide but now the kids are totally opposed to the idea.
Vidya
Vidya, I LOVE ZEBRA RUGS AND YOUR PROJECT CAUGHT MY EYE. yOU DID A GREAT JOB. i IMMEDIATELY THOUGHT i WOULD DOUBLE IT AND SEW IT TOGETHER ON THE SEWING MACHINE. tHEN PAINT BOTH SIDES.THERE ARE OTHER CONSIDERATIONS LIKE PAINT BLEEDING THROUGH TO THE OTHER PIECE OF THE CLOTH BUT IT COULD BE DONE. wASHING IS NO PROBLEM BUT DON’T DRY IN THE DRYER ….LAY ON THE DRIVEWAY OR PATIO. iRON TOUCH UP.
i MADE OUT DOOR DRAPES FOR OUR LANAI TEN YEARS AGO. tHEY GET SOME MOLD AND DIRT FROM RAIN ETC. ( fLORIDA) i WASH THEM TWICE A YEAR (OR MORE) AND HANG THEM UP DAMP. tHE WIND BLOWS THEM DRY AND A LITTLE BLEACH TAKES CARE OF MOLD. tHEY LOOK LIKE A CABANA WITH TIE BACKS AND ARE AS GOOD AS THE DAY i PUT THEM UP. THE SEWING THAT NEEDED TO BE DONE WAS BY MACHINE. HOME DEPOT DROP CLOTHS ( iT TAKES ABOUT THREE TRIPS TO THE WASHING MACHINE )